Where has this week gone??! Seriously, One minute I said hello Monday and next I am ready to wind down and enjoy me some Grey's & PP.. Love my Thursdays!!
I wanted to share a quick note for you all.
I was...
ready??
Sure??
....I was featured.... on this super cute blog...
Its wreath week over at Sassy Style and she has lots of inspirational photos of wreaths. Some tutorials as well to help you get there! Go check it out you wont be disappointed.
So back to the feature! Sassy Style had a guest blogger from Tatertots & Jello and she featured my burlap wreath in her post featuring her favorite fall wreaths! YIPPEE!!
Another site re-U used it for inspiration to make her holiday wreath! Check hers out here!! Super cute!
This was a great honor to have it displayed for everyone to see!
Thanks for the feature ladies! And I hope everyone will go see their sites! Great btw...
Thursday, October 20, 2011
Monday, October 17, 2011
And Im back in action..
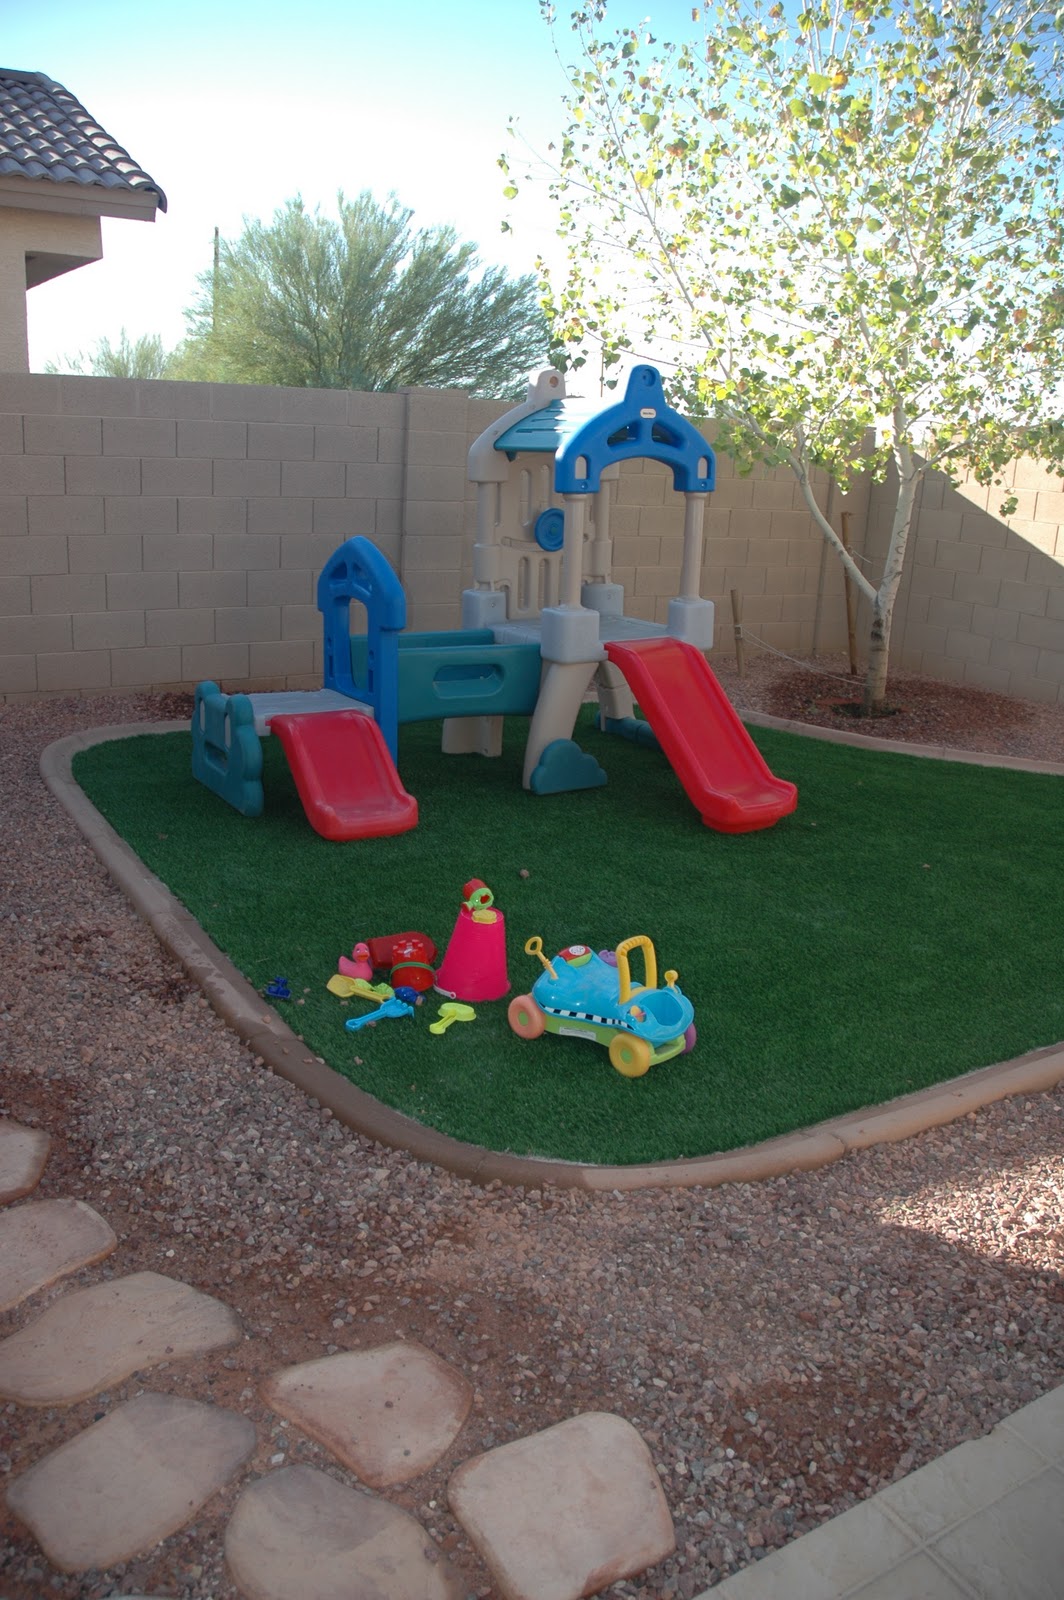
For the past month I have been on hiatus (spelling, lol) from big home improvement projects. The backyard had taken over the mind, life, month, wallet, and sanity.
The backyard is a place I dream to relax when it starts to cool down. The past few years it has been.. well.. lets just put it this way.. NOT a place of relaxation.
So we have been working hard and getting it ready for a transformation.
Digging up the old grass that could never grow with this Arizona clay we have for dirt.
So here you go. Enough said.. here are some pictures of before and after.
The before is when we finally got the curbing in and were getting the sand down for the synthetic grass, but you will get the idea.. Its not hard to visualize ugly dead grass through out the entire area..

Ready for the after!
I am so proud.. So proud of the hubby for keeping my eye on the prize.. As many times as I said "Its not gonna get done". He held strong, and like so.. we finished strong! Thanks honey!


Now to start enjoying the fall weather as we Arizonians do! This is the best time of the year.. Better enjoy it while it last!
Now to build that outdoor sectional to relax on while little princess is playing! Hmm..
The job is never done is it??!
Oh well.. this one is! THANKFULLY!
The backyard is a place I dream to relax when it starts to cool down. The past few years it has been.. well.. lets just put it this way.. NOT a place of relaxation.
So we have been working hard and getting it ready for a transformation.
Digging up the old grass that could never grow with this Arizona clay we have for dirt.
So here you go. Enough said.. here are some pictures of before and after.
The before is when we finally got the curbing in and were getting the sand down for the synthetic grass, but you will get the idea.. Its not hard to visualize ugly dead grass through out the entire area..
 |
| After removing all the dead grass. Curbing installed. |

 |
| Can't stand messes.. UGh.. This drove me NUTS! |
I am so proud.. So proud of the hubby for keeping my eye on the prize.. As many times as I said "Its not gonna get done". He held strong, and like so.. we finished strong! Thanks honey!

 | |
| Already grilling!! Yes! |
 |
| Enjoying her new backyard!! Needed to spotlight my little angel for a second! |
Now to start enjoying the fall weather as we Arizonians do! This is the best time of the year.. Better enjoy it while it last!
Now to build that outdoor sectional to relax on while little princess is playing! Hmm..
The job is never done is it??!
Oh well.. this one is! THANKFULLY!
Saturday, October 8, 2011
Quick how to for Flower Pillows.
Hello Blog world.. If you haven't jumped on the wagon of pillow flowers, here is your chance.. I did and love the ride!
So cute these are. And so super simple.

Simple?
The point of my projects.. SIMPLE!!
Awwww.. sigh.
I had some leftover fabric from a chair I redid.. You will see shortly... and picked up a remnant of fall orange material.. Love remnants!
Ill move on.. So I made my simple little pillow, stuffed it with filling from a down pillow that we got along with our couch.. Hate the pillows that match the couch. Ick.. So I used the stuffing.. I have 3 1/2 more pillows to make.. Floor pillows here I come... anyway..
Distractions..
So make the pillow. Cut your flower fabric into strips. Now I used a iron on patch from the craft store as my backing of the flower. It was sturdy enough to hold the flower, stitching, hot glue (yes.. Hot glue) and normal wear and tear of my 16 month old.

Next sew your first strip to the patch. You can hot glue it too.. I had the machine out, so i might as well use it.
I randomly sewed into a make-shift circle, starting from the center working your way around in a larger circle. Leave room for another strip to go on top of the sewn piece. My main reason to sew the first strip on was so the patch had something other than glue to hold onto in case the glue couldn't hold its own.. lol
Finish the entire strip that way.


Heat that glue gun up while you move on to stitching a light and long stitch across the middle of another strip and then on the edge of another strip. Then scrunch them up to your liking.


Start gluing the strip that you sewed down the middle on the center. Gluing the areas where the stitching are.
Again.. you could just glue all of the fabric and scrunch it as you glue to be way easier.. I make things not so simple sometimes.. I just wanted this pillow to hold up longer than this fall season.


Finished?
Be sure the cover your stitches with fabric, move it around till you get it just right..
Does this make any sense..
Easier DONE than SAID!?!
Ok.. Time to move onto the outer strip. That's why you did the stitch on the outer edge to avoid noticing it once you have glued it down. Start from the outer edge of the flower and glue around being sure to add the scrunch or bunch as you like.
After that.. Done.. Almost..
Cut any excess patch from the back of the flower. And get that pillow and hot glue that pretty flower onto your pillow. In any location you like. I like off centered.. so thats where mine went!
Be sure to glue down any edges that seem to be easy to pull up..
And throw it in a chair, on the sofa or bed and you are done!


Simple. Hope its as simple for you!
Did I mention this cost less than $5??! Yep.. it did!! Less than $2 if you count that I had the pillow fabric already as a leftover!! Just saying..
Comment if you have any questions or if you liked the tutorial! Good Luck!
Psst... Side note.. Ready for a little reupholstering?? I am!! That chair is in desperate need of a face lift.. Keep checking back to see how that goes.. Eek!!
Linked to:
YATTM
So cute these are. And so super simple.

Simple?
The point of my projects.. SIMPLE!!
Awwww.. sigh.
I had some leftover fabric from a chair I redid.. You will see shortly... and picked up a remnant of fall orange material.. Love remnants!
Ill move on.. So I made my simple little pillow, stuffed it with filling from a down pillow that we got along with our couch.. Hate the pillows that match the couch. Ick.. So I used the stuffing.. I have 3 1/2 more pillows to make.. Floor pillows here I come... anyway..
Distractions..
So make the pillow. Cut your flower fabric into strips. Now I used a iron on patch from the craft store as my backing of the flower. It was sturdy enough to hold the flower, stitching, hot glue (yes.. Hot glue) and normal wear and tear of my 16 month old.

 |
| Cut the patch a little bigger than you want your flower. |
Next sew your first strip to the patch. You can hot glue it too.. I had the machine out, so i might as well use it.
I randomly sewed into a make-shift circle, starting from the center working your way around in a larger circle. Leave room for another strip to go on top of the sewn piece. My main reason to sew the first strip on was so the patch had something other than glue to hold onto in case the glue couldn't hold its own.. lol
Finish the entire strip that way.


 |
| Yea. not so pretty now.. But be patient! |
Heat that glue gun up while you move on to stitching a light and long stitch across the middle of another strip and then on the edge of another strip. Then scrunch them up to your liking.


Start gluing the strip that you sewed down the middle on the center. Gluing the areas where the stitching are.
Again.. you could just glue all of the fabric and scrunch it as you glue to be way easier.. I make things not so simple sometimes.. I just wanted this pillow to hold up longer than this fall season.


Finished?
Be sure the cover your stitches with fabric, move it around till you get it just right..
 |
| After the second strip was glued to the center |
Does this make any sense..
Easier DONE than SAID!?!
Ok.. Time to move onto the outer strip. That's why you did the stitch on the outer edge to avoid noticing it once you have glued it down. Start from the outer edge of the flower and glue around being sure to add the scrunch or bunch as you like.
 |
| After the outer edge was glued |
After that.. Done.. Almost..
Cut any excess patch from the back of the flower. And get that pillow and hot glue that pretty flower onto your pillow. In any location you like. I like off centered.. so thats where mine went!
Be sure to glue down any edges that seem to be easy to pull up..
And throw it in a chair, on the sofa or bed and you are done!


Simple. Hope its as simple for you!
Did I mention this cost less than $5??! Yep.. it did!! Less than $2 if you count that I had the pillow fabric already as a leftover!! Just saying..
Comment if you have any questions or if you liked the tutorial! Good Luck!
Psst... Side note.. Ready for a little reupholstering?? I am!! That chair is in desperate need of a face lift.. Keep checking back to see how that goes.. Eek!!
Linked to:
YATTM
Sunday, October 2, 2011
Member that chandelier I purchased over at GW??
Hey all.
So do you all remember that chandelier I found miraculously hiding in a box at Goodwill.. $15?? Anyone?? Check it out here.
Well. I have been hunting around for a place to get the prisms and beads. I had luck at save-on-crafts.com, and a website my grams had found. Although they were relatively cheap I wanted to go "cheaper". So here is the before and the after of what I came up with.. Tell me what you think.. Cheap to Chic??
Here is a little way to update your chandelier on a serious dime.
I have a pretty small budget when it comes to decorating. So i make it go as far as I can.
So for this project I was not about to spend $40 on crystals to make this chandelier work.
Finally.. came up with some ideas..
One... in particular that worked...
Dollar tree.. Again??! yes.. I was inspired to check there first..
I found "Disco ball" bead necklaces in the party area. They were the exact size as the glass beads already on the chandelier. Score!!
So I got to work..
Black gloss spray paint, and a coat hanger.
I started measuring and playing around with them after they were done drying.
glue gun ready??
Check!
Scissors close?
Check!
Here we go!
I glued them to areas I thought they needed to go and added some to the bottom and voila! You have a completed chandelier for $2! They came in packs of 2, and I needed 2 packs!
Woo hoo!!

What do you think??
Like it?
Does it look cheap or chic??!
Comment and let me know what you think?
This was placed in my entry way.. I debated painting it a fun color, but thought black would be elegant and timeless. So it stayed black... uh humm.. for the time being anyway!
Linked to:
YATTM
Coastal Charm
The DIYshowoff
Addicted2Decorating
Primp
Miss Mustard Seed
Now to actually work on the entry way.. Here is what it looks like now..
So do you all remember that chandelier I found miraculously hiding in a box at Goodwill.. $15?? Anyone?? Check it out here.
Well. I have been hunting around for a place to get the prisms and beads. I had luck at save-on-crafts.com, and a website my grams had found. Although they were relatively cheap I wanted to go "cheaper". So here is the before and the after of what I came up with.. Tell me what you think.. Cheap to Chic??
 |
| Before |
 |
| After |
I have a pretty small budget when it comes to decorating. So i make it go as far as I can.
So for this project I was not about to spend $40 on crystals to make this chandelier work.
Finally.. came up with some ideas..
One... in particular that worked...
Dollar tree.. Again??! yes.. I was inspired to check there first..
I found "Disco ball" bead necklaces in the party area. They were the exact size as the glass beads already on the chandelier. Score!!
So I got to work..
Black gloss spray paint, and a coat hanger.
 | |
| break them apart to a single strand and take off any extra plastic pieces. |
 |
| Spray paint.. Be patient here, dont miss any areas. You will notice! |
glue gun ready??
Check!
Scissors close?
Check!
Here we go!
I glued them to areas I thought they needed to go and added some to the bottom and voila! You have a completed chandelier for $2! They came in packs of 2, and I needed 2 packs!
Woo hoo!!

What do you think??
Like it?
Does it look cheap or chic??!
Comment and let me know what you think?
This was placed in my entry way.. I debated painting it a fun color, but thought black would be elegant and timeless. So it stayed black... uh humm.. for the time being anyway!
Linked to:
YATTM
Coastal Charm
The DIYshowoff
Addicted2Decorating
Primp
Miss Mustard Seed
Now to actually work on the entry way.. Here is what it looks like now..
 |
| Pretty boring, right?? I have tried a few pics and mirrors, but thats it!! Its time for serious revamp!! |
Dollar Tree apothecary holders in 1 hour
Hey everyone. Its seems like forever, but I have been crazy busy with so many projects and Bis-a-ness, I cant seem to get a second to put it on the blog. But here is a quick little post for those that need holders to put those holiday (yummy smelling) candles. I love candles and what better way to add sparkle to a little area.. And from the dollar tree.. How could it get much better!??!
I love the Dollar tree! Seriously.. Its so neat to walk through and see what fun stuff I can create from something for only a buck!
Here you are..

3 glass candle stick holders. I bought 2 of the large cylinder vases, and a short one. The short one was located in the candle isle. They have TONS to choose from. Choose what you like.

Epoxy glue the bottoms to the top. Put a book on top for pressure and let dry 30 mins.. Ta-duh. Fill with your choice of candle or candy and your done.


I may be giving these to my sister for her apartment decor and make another set with wooden tops.. Well see. Ill post a link to that "if" it turns out well!
Have fun shopping at the Dollar Tree.. plus I got the candles there too.. Yummy smelling for fall actually. Normally I get the unscented but these actually don't have a powerful smell and are decent too!
See you next post!
I love the Dollar tree! Seriously.. Its so neat to walk through and see what fun stuff I can create from something for only a buck!
Here you are..
3 glass candle stick holders. I bought 2 of the large cylinder vases, and a short one. The short one was located in the candle isle. They have TONS to choose from. Choose what you like.

Epoxy glue the bottoms to the top. Put a book on top for pressure and let dry 30 mins.. Ta-duh. Fill with your choice of candle or candy and your done.


I may be giving these to my sister for her apartment decor and make another set with wooden tops.. Well see. Ill post a link to that "if" it turns out well!
Have fun shopping at the Dollar Tree.. plus I got the candles there too.. Yummy smelling for fall actually. Normally I get the unscented but these actually don't have a powerful smell and are decent too!
|
| I have already started using the candles.. So pardon the wax melting already!! Love them and the flames sparkle so pretty at night. |
See you next post!
Subscribe to:
Posts (Atom)